zabbix server, client 설치
=====================================================
소스설치
환경 및 선행 설치
CentOS7
Apache 2.4.41 source 설치
mysql 5.7.14 source 설치
php-7.2 이상 버전필수 7.3.9 source 설치
=====================================================
Zabbix 계정 및 그룹생성
=====================================================
CentOS
groupadd --system zabbix
useradd --system -g zabbix -d /usr/local/zabbix -s /sbin/nologin -c "Zabbix Monitoring System" zabbix
mkdir -m u=rwx,g=rwx,o= -p /usr/local/zabbix/server
chown -R zabbix:zabbix /usr/local/zabbix
mkdir -p /home/zabbix
chown zabbix:zabbix /home/zabbix
chmod -R 755 /home/zabbix
=====================================================
Ubuntu
addgroup --system --quiet zabbix
adduser --quiet --system --disabled-login --ingroup zabbix --home /var/local/zabbix --no-create-home zabbix
mkdir -m u=rwx,g=rwx,o= -p /usr/local/zabbix
chown zabbix:zabbix /usr/local/zabbix
=====================================================
Zabbix 설치를위한 설치도구
yum install -y libevent-devel libcurl-devel gcc* net-snmp net-snmp-devel wget gcc libxml2-devel net-snmp-devel curl-devel unixODBC-devel OpenIPMI-devel libssh2-devel iksemel-devel openldap-devel libevent-devel
apt-get install -y libevent-devel libcurl-devel gcc* net-snmp net-snmp-devel wget
=====================================================
Zabbix 다운, 컴파일 및 설치
=====================================================
cd /usr/local/src
wget https://cdn.zabbix.com/zabbix/sources/stable/5.0/zabbix-5.0.0.tar.gz
tar zxvf zabbix-5.0.0.tar.gz
cd zabbix-5.0.0
\cp -arpf /usr/local/src/zabbix-5.0.0/ui/* /home/zabbix/
mysql source설치
./configure --prefix=/usr/local/zabbix/server --enable-server --enable-agent --with-mysql=/usr/local/mysql/bin/mysql_config --enable-ipv6 --with-net-snmp --with-libcurl --with-libxml2 --with-openipmi --with-unixodbc --with-ssh2 --with-ldap
mysql yum 설치
./configure --prefix=/usr/local/zabbix/server/ --enable-server --enable-agent --with-net-snmp --with-libcurl --with-libxml2 --enable-ipv6 --with-mysql

=====================================================
make install
./configure --prefix=/usr/local/zabbix/server --enable-server --enable-agent --with-mysql=/usr/local/mysql/bin/mysql_config --enable-ipv6 --with-net-snmp --with-libcurl --with-libxml2 --with-openipmi --with-unixodbc --with-ssh2 --with-ldap
make -j 8 && make install
=====================================================
zabbix 데이터베이스 만들기
\cp -arpf /usr/local/src/zabbix-5.0.0/ui/* /home/zabbix/
mysql -uroot -p
mysql> create database zabbix character set utf8 collate utf8_general_ci;
mysql> create database zabbix character set utf8 collate utf8_bin;
mysql> grant all privileges on zabbix.* to 'zabbix'@'localhost' identified by '비밀번호입력해';
mysql> grant all privileges on zabbix.* to 'zabbix'@'%' identified by '비밀번호입력해';
mysql> flush privileges;
mysql> exit
mysql -uroot -p zabbix < schema.sql
mysql -uroot -p zabbix < images.sql
mysql -uroot -p zabbix < data.sql
=====================================================
zabbix server 설정
=====================================================
vi /usr/local/zabbix/server/etc/zabbix_server.conf
=====================================================
# ListenPort=10051 // 주석해제
LogFile=/tmp/zabbix_server.log
DBHost=localhost
DBName=zabbix
DBUser=zabbix
# DBPassword=DB패스워드 // 주석해제 및 DB 패스워드 입력
DBSocket=/usr/local/mysql/tmp/mysql.sock //변경
DBPort=3306
Timeout=4
LogSlowQueries=3000
StatsAllowedIP=127.0.0.1
=====================================================
mysql Source설치한 서버는 아래적힌 부분을 해야한다.
vi /etc/ld.so.conf
=====================================================
include ld.so.conf.d/*.conf
/usr/local/mysql/include/mysql
/usr/local/mysql/lib/mysql
/usr/local/lib
/usr/lib
/usr/lib64
=====================================================
/sbin/ldconfig -v
=====================================================
Zabbix 실행
/usr/local/zabbix/server/sbin/zabbix_server -c /usr/local/zabbix/server/etc/zabbix_server.conf
실행확인
ps -ef | grep zabbix
cp -arp /usr/local/zabbix/zabbix-3.4.1/frontends/php/* /home/zabbix
netstat -ntlp
tcp 0 0 0.0.0.0:10051 0.0.0.0:* LISTEN 4060/zabbix_server
tcp6 0 0 :::10051 :::* LISTEN 4060/zabbix_server
=====================================================
vi /usr/local/apache/conf/extra/httpd-vhosts.conf
=====================================================
<VirtualHost *:80>
DocumentRoot "/home/zabbix"
<Directory "/home/zabbix">
Options Indexes FollowSymLinks
AllowOverride none
Require all granted
</Directory>
ServerName 도메인
ErrorLog "logs/도메인-error_log"
CustomLog "logs/도메인-access_log" common
</VirtualHost>
=====================================================
chmod 755 /home/zabbix
/etc/init.d/apachectl stop
/etc/init.d/apachectl start
=====================================================
방화벽 설정하기
80,3306,10050,10051 4개 tcp,udp포트 다 열어준다.
=====================================================
Zabbix_server 서비스 데몬 생성
vi /usr/lib/systemd/system/zabbix_server.service
=====================================================
[Unit]
Description=zabbix_server
[Service]
Type=simple
PIDFile=/tmp/zabbix_server.pid
ExecStart=/usr/local/zabbix/server/sbin/zabbix_server -c /usr/local/zabbix/server/etc/zabbix_server.conf
User=zabbix
Group=zabbix
RestartSec=10
Restart=always
[Install]
WantedBy=multi-user.target
=====================================================
systemctl daemon-reload
systemctl enable zabbix_server
systemctl start zabbix_server
=====================================================
=====================================================
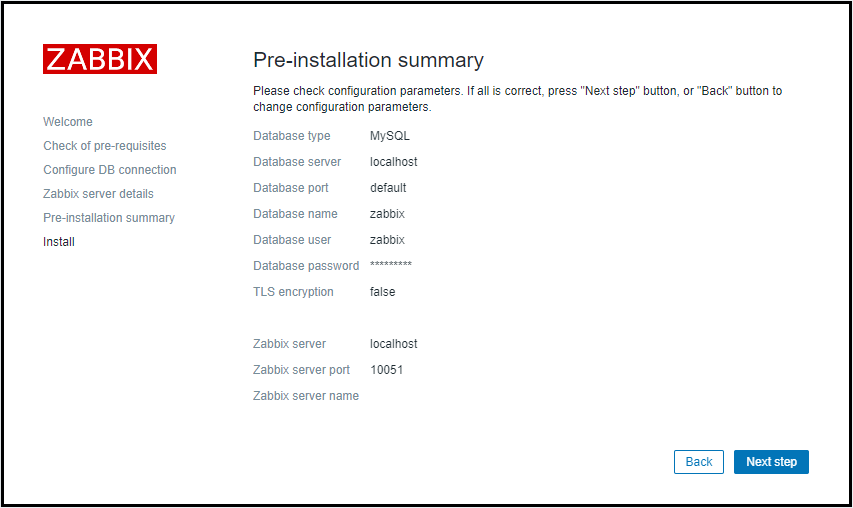
밑에 사진에서 PHP version은 잘못된겁니다.
zabbix 5.0.0으로 하면 require PHP version은 7.2입니다.


=====================================================
vi /usr/local/apache/conf/php.ini( 소스설치 )
vi /etc/php.ini (yum 설치)
=====================================================
max_execution_time = 300
max_input_time = 300
date.timezone = Asia/Seoul
=====================================================
cd /usr/local/src/APM_Setup/php-7.3.9/ext/ldap
/usr/local/php/bin/phpize
=====================================================
Configuring for:
PHP Api Version: 20151012
Zend Module Api No: 20151012
Zend Extension Api No: 320151012
=====================================================
\cp -arpf /usr/lib64/libldap* /usr/lib/
./configure --with-ldap --with-php-config=/usr/local/php/bin/php-config
make -j 8 && make install
=====================================================
Installing shared extensions: /usr/local/php/lib/php/extensions/no-debug-zts-20180731/
=====================================================
ll /usr/local/php/lib/php/extensions/no-debug-zts-20180731/
-rwxr-xr-x 1 root root 174792 Jan 16 05:20 ldap.so
=====================================================
vi /usr/local/apache/conf/php.ini
=====================================================
extension=ldap /주석처리풀고 아래줄은 추가
extension=/usr/local/php/lib/php/extensions/no-debug-zts-20151012/ldap.so
=====================================================
/etc/init.d/apachectl stop
/etc/init.d/apachectl start
=====================================================
그러면 이제 없어진다.


=====================================================
마지막으로 아래 설정파일을 다운로드받아서
cd /home/zabbix/conf
/home/zabbix/conf 에 넣어준다.


=====================================================
ZABBIX 초기 계정 Admin / 패스워드 zabbix

=====================================================
zabbix client 설치
rpm -ivh http://repo.zabbix.com/zabbix/4.4/rhel/7/x86_64/zabbix-agent-4.4.9-1.el7.x86_64.rpm
=====================================================
zabbix client 설정
vi /etc/zabbix/zabbix_agentd.conf
=====================================================
ListenPort=10050
Server=127.0.0.1
ServerActive=zabbix server ip
Hostname=클라이언트 서버 이름 // 설정파일에서 나와서 hostname 쳐보셈 그거그대로 복사해서 붙여넣기
=====================================================
systemctl enable zabbix-agent
systemctl start zabbix-agent
netstat -nltp
Active Internet connections (only servers)
Proto Recv-Q Send-Q Local Address Foreign Address State PID/Program name
tcp 0 0 0.0.0.0:10050 0.0.0.0:* LISTEN 13659/zabbix_agentd
=====================================================
빨간색 네모를 Administration -> Users -> Admin 클릭해줍니다.

=====================================================
이후 Change password를 눌러 비밀번호 변경을 합니다.
Language를 눌러 Korean (ko_KR) 로 변경하고 Update

=====================================================
체크목록추가하기

=====================================================
호스트명, 표시명, 그룹을 추가해준다.

=====================================================
템플릿을 추가해준다.


=====================================================
호스트 그룹에서 찾아서 선택


=====================================================
선택을 한 후 추가를 해준다.

=====================================================
아래 그림과 같이 빨간 네모에 3개가 활성, ZBX, 없음이 초록색으로 들어와야한다.

vsftpd를 일부러 stop하여 내리면 장애가 발생한다고 리포트가 뜬다.

=====================================================
zabbix server, client 설치
https://jsson.tistory.com/14
=====================================================
패키지설치
=====================================================
httpd, mysql(mariadb), php7.3 설치
rpm -Uvh https://repo.zabbix.com/zabbix/5.0/rhel/7/x86_64/zabbix-release-5.0-1.el7.noarch.rpm
yum install -y zabbix-server-mysql zabbix-agent
yum install -y centos-release-scl
rpm -Uvh https://dl.fedoraproject.org/pub/epel/epel-release-latest-7.noarch.rpm
rpm -Uvh http://rpms.famillecollet.com/enterprise/remi-release-7.rpm
yum install -y epel-release httpd* mysql* mariadb-server
yum install -y epel-release vim wget
yum install -y yum-utils
yum update -y
vi /etc/yum.repos.d/zabbix.repo
=====================================================
[zabbix-frontend]
name=Zabbix Official Repository frontend - $basearch
baseurl= http://repo.zabbix.com/zabbix/5.0/rhel/7/$basearch/frontend
enabled=1 << 1로 변경
gpgcheck=1
gpgkey=file:///etc/pki/rpm-gpg/RPM-GPG-KEY-ZABBIX-A14FE591
=====================================================
vi /etc/bashrc
=====================================================
alias vi='vim'
=====================================================
source /etc/bashrc
yum install -y zabbix-web-mysql-scl zabbix-apache-conf-scl
=====================================================
버전확인
httpd -v
Server version: Apache/2.4.6 (CentOS)
Server built: Nov 16 2020 16:18:20
mysql -V
mysql Ver 15.1 Distrib 5.5.68-MariaDB, for Linux (x86_64) using readline 5.1
php -v
PHP 7.3.26 (cli) (built: Jan 5 2021 10:36:07) ( NTS )
Copyright (c) 1997-2018 The PHP Group
Zend Engine v3.3.26, Copyright (c) 1998-2018 Zend Technologies
=====================================================
데몬 시작 및 등록
systemctl enable httpd
systemctl enable mariadb
systemctl start httpd
systemctl start mariadb
=====================================================
zabbix 계정 및 DB 등록
mysql -uroot -p
=====================================================
mysql> create database zabbix character set utf8 collate utf8_bin;
mysql> grant all privileges on zabbix.* to 'zabbix'@'localhost' identified by '비밀번호입력해';
mysql> grant all privileges on zabbix.* to 'zabbix'@'%' identified by '비밀번호입력해';
mysql> flush privileges;
mysql> exit
=====================================================
zabbix 패키지설치 (web버전이 있는 최신버전)
zabbix repo추가
centos 8의 경우 dnf로 설치하여줍니다.
dnf install zabbix-server-mysql zabbix-web-mysql zabbix-agent
=====================================================
yum-config-manager --enable remi-php73
yum install -y php php-curl php-soap php-mysqlnd php-gd php-common php-mbstring php-mcrypt php-xml php-devel php-process php-pecl-zip
=====================================================
zabbix DB mysql에 넣어주기
zcat /usr/share/doc/zabbix-server-mysql-5.0.7e/create.sql.gz | mysql -u zabbix -p zabbix
=====================================================
zabbix server 설정
=====================================================
vi /etc/zabbix/zabbix_server.conf
=====================================================
# ListenPort=10051 // 주석해제
DBHost=localhost
DBName=zabbix
DBUser=zabbix
# DBPassword=DB패스워드 // 주석해제 및 DB 패스워드 입력
=====================================================
방화벽 설정
vi /etc/sysconfig/iptables
=====================================================
-A RH-Firewall-1-INPUT -p tcp -m state --state NEW -m tcp --dport 80 -j ACCEPT
-A RH-Firewall-1-INPUT -p tcp -m state --state NEW -m tcp --dport 443 -j ACCEPT
-A RH-Firewall-1-INPUT -p tcp -m state --state NEW -m tcp --dport 3306 -j ACCEPT
-A RH-Firewall-1-INPUT -p tcp -m state --state NEW -m tcp --dport 10050 -j ACCEPT
-A RH-Firewall-1-INPUT -p udp -m state --state NEW -m udp --dport 10050 -j ACCEPT
-A RH-Firewall-1-INPUT -p tcp -m state --state NEW -m tcp --dport 10051 -j ACCEPT
-A RH-Firewall-1-INPUT -p udp -m state --state NEW -m udp --dport 10051 -j ACCEPT
=====================================================
systemctl restart iptables
APM 설정
vi /etc/httpd/conf/httpd.conf
=====================================================
User nobody
Group nobody
ServerName localhost:80
<Directory />
AllowOverride none
Require all granted
</Directory>
<IfModule dir_module>
DirectoryIndex index.html index.php index.jsp
</IfModule>
ErrorLog "logs/error.log"
CustomLog "logs/access.log" combined
=====================================================
vi /etc/httpd/conf.d/vhosts.conf
=====================================================
<VirtualHost *:80>
DocumentRoot "/usr/share/zabbix/"
<Directory "/usr/share/zabbix/">
Options Indexes FollowSymLinks
AllowOverride none
Require all granted
</Directory>
ServerName 도메인
ServerAlias www.도메인
ErrorLog "/etc/httpd/logs/도메인-error_log"
CustomLog "/etc/httpd/logs/도메인-access_log" common
</VirtualHost>
=====================================================
mkdir -p /home/zabbix
chown zabbix:zabbix /home/zabbix
chmod -R 755 /home/zabbix
vi /etc/php.ini
=====================================================
max_execution_time = 600
max_input_time = 600
memory_limit = 256M
post_max_size = 100M
upload_max_filesize = 100M
date.timezone = Asia/Seoul
short_open_tag = On
expose_php = Off
display_errors = Off
allow_url_fopen = Off
=====================================================
systemctl restart zabbix-server zabbix-agent httpd
systemctl enable zabbix-server zabbix-agent httpd
=====================================================
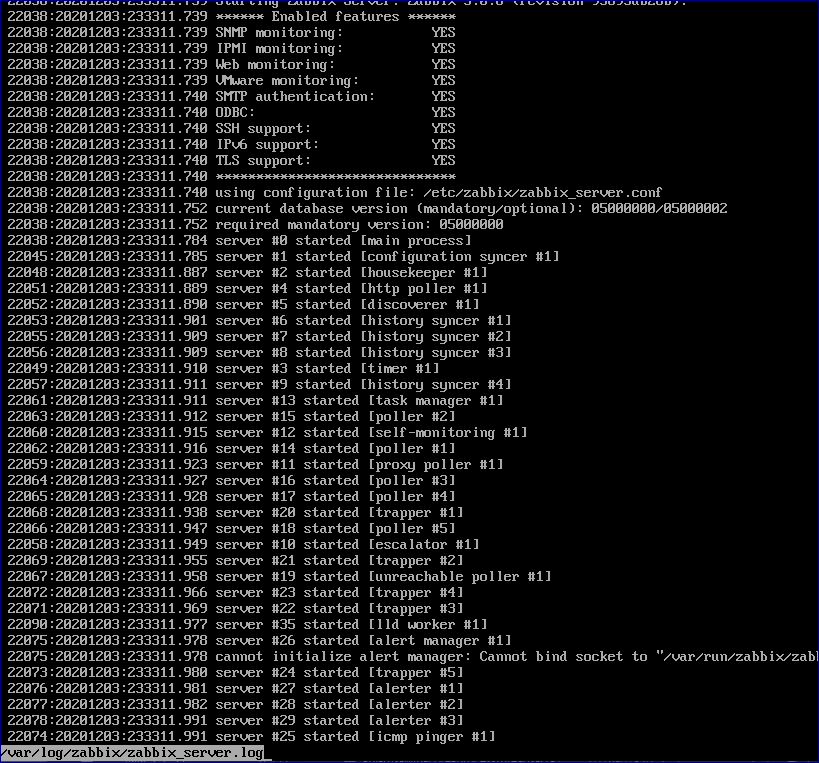
tail -f /var/log/zabbix/zabbix_server.log
=====================================================

vi /etc/opt/rh/rh-php72/php-fpm.d/zabbix.conf
=====================================================
php_value[date.timezone] = Asia/Seoul
=====================================================
systemctl restart zabbix-server zabbix-agent httpd rh-php72-php-fpm
systemctl enable zabbix-server zabbix-agent httpd rh-php72-php-fpm
=====================================================
http://Server_IP/zabbix
또는
http://도메인/zabbix
=====================================================
Ubuntu에서 설치
=====================================================
apt-get update -y
apt-get upgrade -y
apt-get install -y apache2*
apt-get install -y mariadb*
dpkg-reconfigure tzdata
apt-get update -y
apt-get install -y ntpdate
ntpdate pool.ntp.br
timedatectl set-ntp 0
apt-get install ntp
=====================================================
apt-get update -y
apt-get install -y build-essential libmysqlclient-dev libssl-dev libsnmp-dev libevent-dev libopenipmi-dev libcurl4-openssl-dev libxml2-dev libssh2-1-dev libpcre3-dev libldap2-dev libiksemel-dev libcurl4-openssl-dev libgnutls28-dev
=====================================================
mysql -uroot -p
mysql> use mysql;
mysql> update user set password=password('루트비밀번호') where user='root';
mysql> create database zabbix character set utf8 collate utf8_bin;
mysql> grant all privileges on zabbix.* to 'zabbix'@'localhost' identified by '비밀번호입력해';
mysql> grant all privileges on zabbix.* to 'zabbix'@'%' identified by '비밀번호입력해';
mysql> flush privileges;
mysql> exit
=====================================================
cd /usr/local/src
wget http://repo.zabbix.com/zabbix/5.0/ubuntu/pool/main/z/zabbix-release/zabbix-release_5.0-1+bionic_all.deb
dpkg -i zabbix-release_5.0-1+bionic_all.deb
apt install -y zabbix-server-mysql zabbix-frontend-php zabbix-agent
apt install -y zabbix-agent zabbix-server-mysql php-mysql zabbix-frontend-php
apt -y install zabbix-server-mysql zabbix-frontend-php zabbix-apache-conf zabbix-agent
apt-get install -y php7.2 php7.2-mysql libapache2-mod-php7.2 php7.2-mbstring php7.2-xml php7.2-gd php7.2-curl php7.2-bcmath php7.2-ldap
=====================================================
updatedb
locate php.ini
vi /etc/php/7.2/apache2/php.ini
=====================================================
max_execution_time = 300
memory_limit = 256M
post_max_size = 100M
max_input_time = 300
date.timezone = Asia/Seoul
upload_max_filesize = 100M
short_open_tag = On
allow_url_fopen = Off
=====================================================
addgroup --system --quiet zabbix
adduser --quiet --system --disabled-login --ingroup zabbix --home /var/local/zabbix --no-create-home zabbix
mkdir -m u=rwx,g=rwx,o= -p /usr/local/zabbix
chown zabbix:zabbix /usr/local/zabbix
=====================================================
vi /etc/zabbix/zabbix_server.conf
=====================================================
12번째라인
# ListenPort=10051 // 주석해제
115번째 라인
# DBPassword=DB패스워드 // 주석해제 및 DB 패스워드 입력
=====================================================
vi /etc/iptables/rules.v4
=====================================================
:RH-Firewall-1-INPUT - [0:0]
-A INPUT -j RH-Firewall-1-INPUT
-A FORWARD -j RH-Firewall-1-INPUT
-A RH-Firewall-1-INPUT -i lo -j ACCEPT
-A RH-Firewall-1-INPUT -p icmp -m icmp --icmp-type any -j ACCEPT
-A RH-Firewall-1-INPUT -m state --state RELATED,ESTABLISHED -j ACCEPT
-A RH-Firewall-1-INPUT -p tcp -m state --state NEW -m tcp --dport 80 -j ACCEPT
-A RH-Firewall-1-INPUT -p tcp -m state --state NEW -m tcp --dport 443 -j ACCEPT
-A RH-Firewall-1-INPUT -p tcp -m state --state NEW -m tcp --dport 3306 -j ACCEPT
-A RH-Firewall-1-INPUT -p tcp -m state --state NEW -m tcp --dport 10050 -j ACCEPT
-A RH-Firewall-1-INPUT -p udp -m state --state NEW -m udp --dport 10050 -j ACCEPT
-A RH-Firewall-1-INPUT -p tcp -m state --state NEW -m tcp --dport 10051 -j ACCEPT
-A RH-Firewall-1-INPUT -p udp -m state --state NEW -m udp --dport 10051 -j ACCEPT
=====================================================
systemctl restart netfilter-persistent.service
zcat /usr/share/doc/zabbix-server-mysql/create.sql.gz | mysql -uzabbix -p zabbix
=====================================================
vi /etc/zabbix/apache.conf
=====================================================
php_value date.timezone Asia/Seoul
=====================================================
systemctl restart zabbix-server zabbix-agent apache2
systemctl enable zabbix-server zabbix-agent apache2
'Linux OS > 관리' 카테고리의 다른 글
| 장애났을때 서버 확인하는 명령어 (0) | 2023.03.12 |
|---|---|
| r8169 -> r8168 네트워크 드라이브 변경 (0) | 2023.03.12 |
| Owasp Zap 설치하기 (0) | 2023.03.12 |
| 서버 이전 (0) | 2023.03.12 |
| vncserver 서비스 데몬 만들기 (0) | 2023.03.12 |


댓글