awstats는 web, ftp, mail 서버의 통계를 그래픽 적으로 생성해 주는 기능성 툴 입니다.
awstats 로그 분석은 CGI 나 다른 명령어로 부터 그리고 로그에 포함된 모든 정보를 보여줄 수 있습니다.
그 안에 그래픽적으로 웹페이지가 포함되어 있습니다.
특징
- 웹로그가 보이는 모든 정보를 알기쉽게 보여줍니다.
- 무제한의 로그파일 사이즈
- 모양과 컬러는 각자의 사이트에 필적합니다.
- 사용이 쉽습니다.
특징들
전체 로그 분석을 통해 AWStats에서 다음 정보를 표시할 수 있습니다.
* 방문횟수, 고유 방문횟수
* 방문 기간 및 마지막 방문 기간,
* 인증된 사용자 및 마지막으로 인증된 방문자
* 요일 및 러시 아워(시간 및 요일별 페이지, 조회수, KB),
* 호스트 방문자의 도메인/국가(페이지, 히트 수, KB, 269개의 도메인/국가 탐지, GeoIp 탐지),
* 호스트 목록, 마지막 방문 및 해결되지 않은 IP 주소 목록,
* 가장 많이 본 페이지, 시작 페이지 및 종료 페이지,
* 파일 형식,
* 웹 압축 통계(mod_gzip 또는 mod_deflate의 경우),
* 사용하는 OS (페이지, 조회수, 각 OS별 KB, 35개의 OS가 검출됨)
* 사용하는 브라우저 (브라우저별 페이지, 조회수, KB, 버전별 (Web, Wap, 미디어 브라우저: 97개 브라우저, browsers_phone.pm 라이브러리 파일을 사용하는 경우 450개 이상),
* 로봇 방문수 (319대 검출),
* 웜 공격 (5개의 웜 패밀리),
* 사이트 검색에 사용되는 검색 엔진, 키워드(야후, 구글, altavista 등 가장 유명한 115개의 검색 엔진이 검색됨)
* HTTP 오류(마지막 레퍼러가 있는 페이지를 찾을 수 없음 등),
* URL, URL 파라미터, 레퍼러 필드에 기반한 기타 개인화된 보고서, 잘못된/마케팅 목적,
* "즐겨찾기 북마크에 추가"된 사이트 횟수
* 화면 크기 (인덱스 페이지에 HTML 태그 추가 필요)
* Java, Flash, RealG2 Reader, Quicktime Reader, WMA Reader, PDF Reader를 지원하는 브라우저 비율(인덱스 페이지에 HTML 태그 추가 필요)
* 부하 분산된 서버 비율에 대한 클러스터 보고서.
AWStats는 다음 기능도 지원합니다.
* 많은 로그 형식을 분석할 수 있습니다.Apache NCSA 복합 로그 파일(XLF/ELF) 또는 공통(CLF), IIS 로그 파일(W3C),WebStar 네이티브 로그 파일 및 기타 웹, 프록시, wap 또는 스트리밍 서버 로그 파일(FTP 또는 메일 로그 파일도 포함)예제는 AWStats F.A.Q.를 참조하십시오.
* 및필터 ),* CGI(CGI)로 동작합니다.
* 웹할 수 통 *,,,,,,, * * * * * * * * * * * * * * * * 。
* 크기 제한 , 파일 시스템 * 스플릿 로그 파일 지원, 스플릿 로그 파일 지원, 스플릿 로그 파일, 스플릿 로그 파일, 스플릿 로그 파일(로드 밸런싱 시스템 스플릿 로그 파일(스플릿 로그 파일)
에서도 로그 할 수 지원
전 분석 중, 파일 "DNS 캐시 파일 지원", "DNS 캐시 파일", "DNS 캐시 파일", "DNS 캐시 파일",
* IP 위치에서 국가 감지용 플러그인(geoip 국가 데이터베이스 또는 클라이언트 도메인 이름 사용),
* IP 로케이션에서 도시를 검출하기 위한 플러그인(지오이피시티 데이터베이스 사용),
* 미국/캐나다 지역용 플러그인, ISP 및/또는 조직 보고서(무료 제3제품 지리 지역, 지리 정보 및/또는 지리 정보 데이터베이스 필요)
* WhoIS 링크,
및 할 수 은필필 / 터필필필필 * * * * 。
되는 여러 웹 서버,웹프로바이더에게 ), * "가상 서버, 웹 호스팅 프로바이더에게 최적",
Site Attacks * 사이트 간 스크립팅 공격 보호,
* 여러 언어.전체 목록은 AWStats F.A.Q.를 참조하십시오.
* Perl * * * * * * * 。동작시킬 수 .
* CGI 력 * * * * * * * * * * * 。
1 프레임 HTML/, export * 1개의 HTML/XHTML 페이지, PDF 페이지,
수, CSS를 할 수 CSS를 사용할 수 있습니다.
페이지의 및 HTML 보고서 페이지
(할 수 있는 개 * 、 1 、 1 、 * * 。
* 를 위해 할 수 XSLT는 XML 형식으로 저장할 수 있습니다.
모듈 Webmin 듈, 、
* 소스(GNU General Public License)가 포함된 웹 호스팅 프로바이더도 절대 무료입니다.
가능 든 * * * *, * 、
* AWStats에는 XML Portable Application Description이 있습니다.
현재 최근에 2023년 01월 17일날 업데이트 되었습니다.
패키지기반으로 이루어진 APM 먼저 진행하겠습니다.
Apache 2.4.57
MariaDB 10.6.12
PHP 8.1.18
# httpd -S
VirtualHost configuration:
*:80 93it-serverengineer.net (/etc/httpd/conf.d/vhost.conf:1)
cd /usr/local/src/
wget https://fossies.org/linux/www/awstats-7.9.tar.gz
tar zxvf awstats-7.9.tar.gz
cp -arp /usr/local/src/awstats-7.9 /usr/local/awstats
chown -R root:root /usr/local/awstats/
cd /usr/local/awstats/tools/
패키지 설치라면 파일들을 수정을 해야합니다.
vi ./awstats_configure.pl
| '/etc/httpd/httpd.conf', 63번째줄을 수정합니다. '/etc/httpd/conf/httpd.conf', |
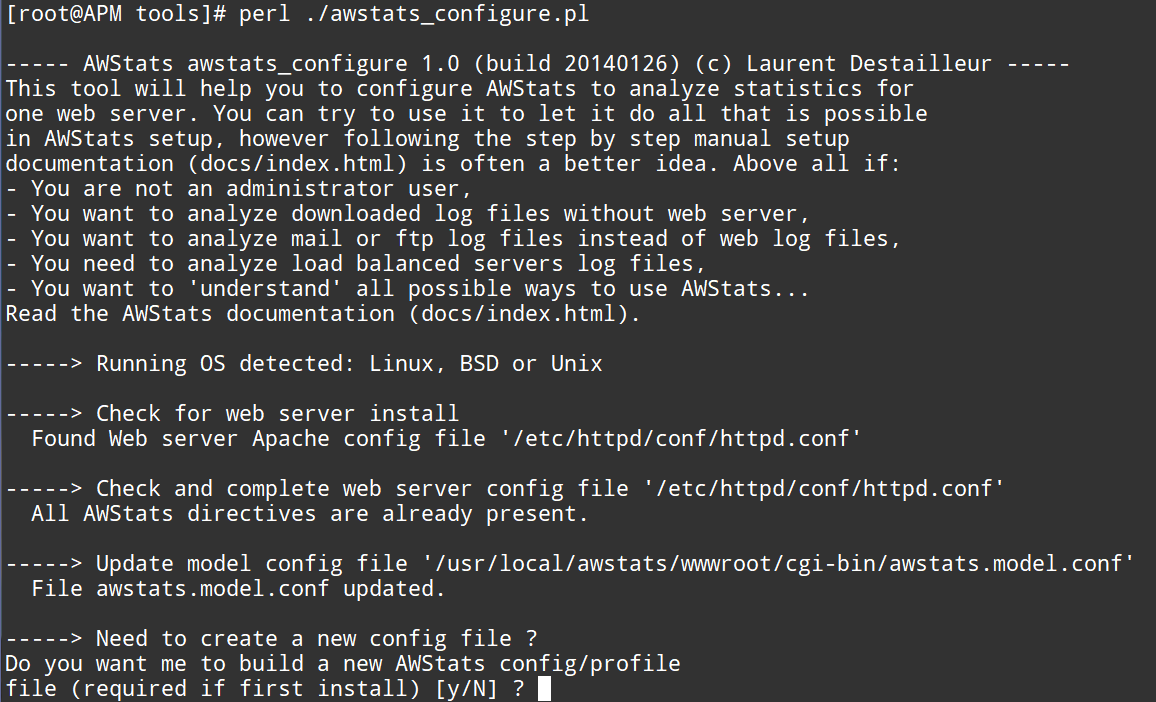
perl ./awstats_configure.pl

file (required if first install) [y/N] ?
해당 물음은 awstats 을 처음 설치할때 묻는 부분으로 Y를 입력합니다. 그게 아니라면 N

여기서 운영하시는 웹서버의 도메인을 입력합니다.

여기서 그냥 엔터를 누른다면 /etc/awstats로 생성이 됩니다.
해당 부분을 그냥 엔터로 누른다면 추후에 설정들은 편해질 수 있습니다.
/usr/local/awstats/wwwroot/cgi-bin/awstats.pl
설정파일이 기본이
"/etc/awstats",
"/usr/local/etc/awstats",
"/etc/opt/awstats"
로 되어있으며,
/usr/local/awstats/tools/awstats_updateall.pl 열어보면 애초에 저렇게 설정되어 있습니다.
my $DIRCONFIG = "/etc/awstats";
2개파일들을 열어보면 기본경로를 제외한 부분이 많이 누락되어있습니다.
만약 설정파일 저장할곳을 바꾼다면 2개의파일을 수정을 하셔야합니다.
/usr/local/awstats/conf 이렇게 정한다면
해당 파일을 /usr/local/awstats/wwwroot/cgi-bin/awstats.pl 아래와 같이 수정해야합니다.
"/usr/local/awstats",
"/usr/local/awstats/conf",
"/etc/awstats",
"/usr/local/etc/awstats",
"/etc/opt/awstats"
/usr/local/awstats/tools/awstats_updateall.pl 파일을 수정해야합니다.
my $DIRCONFIG = "/usr/local/awstats/conf";

/etc/awstats/awstats.93it-serverengineer.net.conf 라는 설정파일이 만들어졌습니다.
여기서 항상 통계 crontab에 자동화설정에 등록해야합니다.
/usr/local/awstats/wwwroot/cgi-bin/awstats.pl -update -config=93it-serverengineer.net
/usr/local/awstats/tools/awstats_updateall.pl now

perl awstats.pl -update -config=93it-serverengineer.net
위의 명령어로 최신화가 될 수 있습니다.
http://localhost/awstats/awstats.pl?config=93it-serverengineer.net 이렇게 나오지만
http://93it-serverengineer.net/awstats/awstats.pl?config=93it-serverengineer.net
이렇게 접속을 합니다.
또는
http://IP/awstats/awstats.pl?config=93it-serverengineer.net
아래 설정파일을 확인합니다.
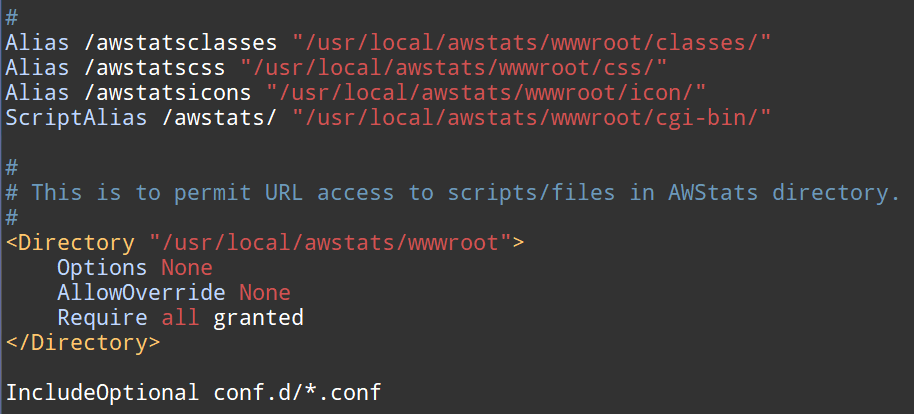
vi /etc/httpd/conf/httpd.conf 맨아래부분을 확인합니다.

| IncludeOptional conf.d/*.conf Alias /awstatsclasses "/usr/local/awstats/wwwroot/classes/" Alias /awstatscss "/usr/local/awstats/wwwroot/css/" Alias /awstatsicons "/usr/local/awstats/wwwroot/icon/" ScriptAlias /awstats/ "/usr/local/awstats/wwwroot/cgi-bin/" # # This is to permit URL access to scripts/files in AWStats directory. # <Directory "/usr/local/awstats/wwwroot"> Options None AllowOverride None Order allow,deny Allow from all </Directory> |
아래에다가 서로 순서를 바꿔줍니다.
즉, 아래와 같이 바꿔줍니다. 그이유는 conf.d 의 디렉토리를 먼저 설정파일들을 먼저 읽기때문에 Alias 가 먼저 되도록 설정합니다.

vi /etc/httpd/conf/httpd.conf
| Alias /awstatsclasses "/usr/local/awstats/wwwroot/classes/" Alias /awstatscss "/usr/local/awstats/wwwroot/css/" Alias /awstatsicons "/usr/local/awstats/wwwroot/icon/" ScriptAlias /awstats/ "/usr/local/awstats/wwwroot/cgi-bin/" # # This is to permit URL access to scripts/files in AWStats directory. # <Directory "/usr/local/awstats/wwwroot"> Options None AllowOverride None Require all granted </Directory> IncludeOptional conf.d/*.conf |
아래와 같이 변경합니다.

| <IfModule log_config_module> # # The following directives define some format nicknames for use with # a CustomLog directive (see below). # LogFormat "%h %l %u %t \"%r\" %>s %b \"%{Referer}i\" \"%{User-Agent}i\" %{GEOIP_COUNTRY_CODE}e" combined #LogFormat "%h %l %u %t \"%r\" %>s %b \"%{Referer}i\" \"%{User-Agent}i\"" combined LogFormat "%h %l %u %t \"%r\" %>s %b" common <IfModule logio_module> # You need to enable mod_logio.c to use %I and %O LogFormat "%h %l %u %t \"%r\" %>s %b \"%{Referer}i\" \"%{User-Agent}i\" %I %O" combinedio </IfModule> # # The location and format of the access logfile (Common Logfile Format). # If you do not define any access logfiles within a <VirtualHost> # container, they will be logged here. Contrariwise, if you *do* # define per-<VirtualHost> access logfiles, transactions will be # logged therein and *not* in this file. # #CustomLog "logs/access_log" common # # If you prefer a logfile with access, agent, and referer information # (Combined Logfile Format) you can use the following directive. # CustomLog "logs/access_log" combined </IfModule> |
vi /etc/httpd/conf.d/vhost.conf
===================================================
<VirtualHost *:80>
ServerName 도메인
ServerAlias www.도메인
DocumentRoot "/home/93it/public_html"
CustomLog "/var/log/httpd/도메인-access_log" combined
ErrorLog "/var/log/httpd/도메인-error_log"
<Directory "/home/93it/public_html/*>
Options FollowSymLinks
AllowOverride All
Require all granted
</Directory>
</VirtualHost>
===================================================
yum install -y GeoIP GeoIP-data perl-Geo-IP GeoIP-devel perl-NetAddr-IP iptables-devel perl-Text-CSV_XS kernel-devel
awstats 데이터들이 저장될 공간을 설정합니다. 디렉토리를 만듭니다.
mkdir /usr/local/awstats/data
이제 생성된 설정파일들을 확인합니다.
[root@APM tools]# vi /usr/local/awstats/conf/awstats.93it-serverengineer.net.conf
파란줄을 빨간줄과 같이 변경합니다.
| LogFile="/var/log/httpd/mylog.log" -> LogFile="/var/log/httpd/93it-serverengineer-access_log" AllowToUpdateStatsFromBrowser=0 -> AllowToUpdateStatsFromBrowser=1 LogFormat=1 -> LogFormat = "%host %other %logname %time1 %methodurl %code %bytesd" 해당 부분은 일단 1로 진행해보고 만약 작업시 문제가 생긴다면 변경해주시길 바랍니다. SiteDomain="93it-serverengineer.net" HostAliases="93it-serverengineer.net www.93it-serverengineer.net 127.0.0.1 localhost" -> HostAliases="93it-serverengineer.net www.93it-serverengineer.net 127.0.0.1 localhost admin.93it-serverengineer.net *.93it-serverengineer.net img.93it-serverengineer.net" 해당 부분은 만약 vhost에서 같은로그들을 쓰고 있다면 93it-serverengineer.net 도메인의 DocumentRoot 가 동일하다면 왠만해서 로그 설정도 동일할겁니다. 그러므로 access_log 들도 설정이 같다면 같은 도메인라인들은 추가적으로 넣어주시길 바랍니다. 만약 같은 IP 에서 운영중이나, 어떠한 도메인으로 들어오는지 확인을하고자 한다면 추가하지말고 같은과정을 반복해서 설정파일을 만들어서 설정하시길 바랍니다. /var/log/httpd/93it-serverengineer-access_log DefaultFile="index.php index.html" 이부분도 잘보시길 바랍니다. 만약 index.htm 이라면 변경하시길 바랍니다. Lang="auto" -> Lang="ko" #LoadPlugin="geoip GEOIP_STANDARD /pathto/GeoIP.dat" -> LoadPlugin="graphgooglechartapi" LoadPlugin="geoip GEOIP_STANDARD /usr/share/GeoIP/GeoIP.dat" LoadPlugin="geoip_city_maxmind GEOIP_STANDARD /usr/share/GeoIP/GeoIPCity.dat" |
/usr/local/awstats/wwwroot/cgi-bin/awstats.pl -update -config=93it-serverengineer.net
/usr/local/awstats/tools/awstats_updateall.pl now

- Did you create your config file 'awstats.93it-serverengineer.net.conf' ?
-> 설정파일 위치를 못찾는것입니다. 해당파일을 수정합니다.
vi /usr/local/awstats/wwwroot/cgi-bin/awstats.pl
1719번째줄에 갑니다.

| "/usr/local/awstats", "/usr/local/awstats/conf", "/etc/awstats", "/usr/local/etc/awstats", "/etc/opt/awstats" 해당 2줄을 추가합니다. |

명령어를 입력합니다.
/usr/local/awstats/wwwroot/cgi-bin/awstats.pl -update -config=93it-serverengineer.net
/usr/local/awstats/tools/awstats_updateall.pl now
vi /etc/crontab
| */5 * * * * root /usr/local/awstats/tools/awstats_updateall.pl now */5 * * * * root /usr/local/awstats/wwwroot/cgi-bin/awstats.pl -update -config=93it-serverengineer.net |
추가합니다.
systemctl enable crond
systemctl restart crond
URL를
http://93it-serverengineer.net/awstats/awstats.pl?config=93it-serverengineer.net
접속합니다.
'Linux OS > 관리' 카테고리의 다른 글
| Ansible를 이용한 Apache 서버 제어 (VirtualHost, SSL) (0) | 2023.11.13 |
|---|---|
| 정리해야할 목록 (0) | 2023.03.26 |
| 리눅스 Xwindow + VNC server 설치 및 설정 (CentOS 7) (0) | 2023.03.26 |
| mrtg 설치 (cpu, ram, hdd 사용량) (0) | 2023.03.26 |
| Linux HDD,SSD 읽기, 쓰기 테스트 (0) | 2023.03.26 |


댓글